
Step-by-Step Horse Prep with Clare Swanson
- Jul 18, 2025
- 4 min read

I had the master horse groomer, Clare Swanson, share her process for getting horses ready for me to come photograph them with their girls. Clare works with Chelsea Carlson at Red's Show Horses in McMinnville, OR. I always really look forward to the sessions I get to do with Chelsea's riders not only because she has some of most fun girls in her program, but I know I can always count on Clare to have them perfectly prepped (like have you seen more straight mane and forelock bands in your life?)! Continue reading to hear Clare's expert advise. But first, check out how awesome Clare is in front of the camera too! These photos are from one of my all time favorite shoots: Clare and Colton in the tulips on a stormy spring evening. The rest of the photos in this post are all horses that Clare has prepped!

From Clare:
Hi, I'm Clare Swanson. I’ve had the opportunity to prepare approximately 50 horses for photo shoots across advertising, sponsorship, and keepsake projects, partnering with multiple gifted photographers. I’ve especially enjoyed working alongside Jeni Jo, an amazing photographer whose shoots are always a pleasure to be part of.
Because photo shoots can be long and demanding for horses, preparing them properly is essential to ensure they look and feel their best on camera. Having banded manes professionally for a decade at national level shows and gained years of experience, I’ve learned the best routine to help horses shine. Here is a step-by-step look at how I get horses photoshoot-ready:

1. Lunge (15–20 minutes)
First, I always start with a good lunge. Horses need to get their energy out before a long day of standing still and posing. This helps them settle, focus, and stay relaxed during the shoot.
2. Bath Time (30 minutes)
Next up is a full bath. I wash everything: mane, tail, legs, face, and body. A clean horse photographs beautifully, and this step really sets the foundation.
Pro tip: Skip detanglers in the mane, they’ll make it too slippery to band later.

3. Drying Time (30 minutes–1 hour)
After the bath, I tie the horse in their stall with fresh water and a hay bag to relax while they dry. This also gives me a break to prep my tools and workspace for the next steps.
4. Clipping (30 minutes)
Once they’re dry, it’s clipping time. I use a 10 blade to clip the legs and white areas on the face, and a 40 blade for the ears, muzzle, chin, and bridle path. If the horse has a lot of white, this can take a bit longer, but it’s worth it for a polished look.
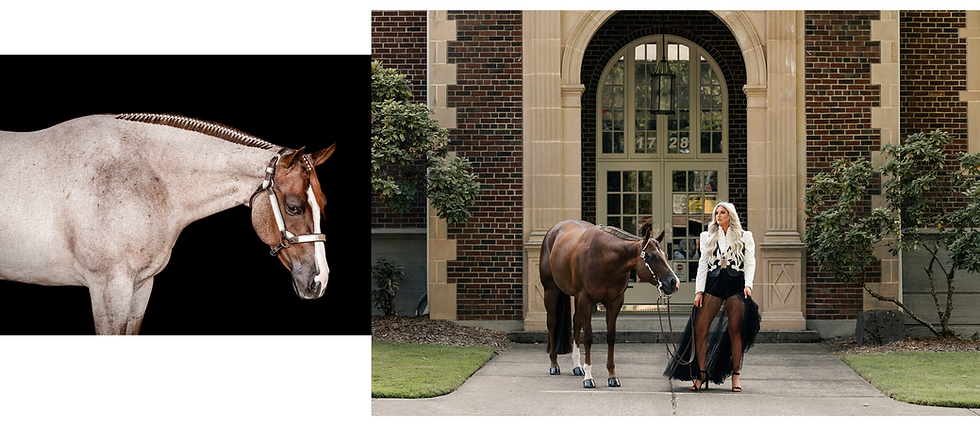
5. Banding the Mane (1 hour)
About two hours before the shoot, I band the mane. This gives it time to settle nicely and not feel rushed.
Once the mane is banded, I put on a sleazy to keep everything neat and in place and they get tied back up so they can’t rub on anything — no last-minute surprises!
6. Final Touches (30 minutes before the shoot)
About 30 minutes before we start shooting, I pull the horse out for final touches. Ideally, they won’t go back into their stall after this point to avoid getting dusty or messing up their grooming.
- Brush them thoroughly to get any dust off
- Apply hoof black or clear polish
- Band the forelock
- Put in the fake tail
- If the shoot involves tack, this is also when I would saddle the horse

7. Ready for the Camera!
When Jeni arrives, I put the horse in whatever the client is using for their shoot (halter or bridle), then apply the final details:
- Clear gel to the muzzle and around the eyes for that glossy, photo-ready shine
- Finishing spray to give the coat a soft, polished glow
Pro tip: Avoid black gel on the muzzle; if your client is wearing light colors, it can easily rub off and ruin their outfit!

My Favorite Products
Here are the go-to products I use for every shoot:
- Orvus Shampoo: A little goes a long way, it gets them squeaky clean and SO shiny.
- Jack’s Bands: My holy grail for banding. They have the perfect amount of stretch and never snap.
- Tail Source Fake Tails: Gorgeous, thick tails with a braided horsehair loop cap that makes application easy.
- World Champion Shine On (Clear Gel): Great for highlighting the muzzle and eyes without the mess of dark products.
- Absorbine SuperShine: Whether you want clear or black hoof polish, it goes on beautifully and lives up to the name, super shiny.
- Pepi Finishing Spray: From the same brand as World Champion. It gives that perfect final polish to the coat.
From start to finish, getting a horse ready typically takes between 3.5 to 4 hours. The exact timing depends on their coat, markings, and how cooperative they are that day. Taking the time to do it right makes a big difference in how they look and feel in front of the camera. Prepping for a shoot takes time and care. However, seeing the final result of a calm, clean, glowing horse in beautiful photos, is always worth it.

Clare has got this down to a science and I'm so grateful to her for sharing her knowledge with us! Be sure to bookmark this post or copy/save it in your notes app for your next photoshoot or even for your next horse show! Ready to read more about prepping for your shoot? Read how to set your horse up for success or how to prepare for an off-property shoot.


Comments